#i am Struggling keeping these under 10mb...
Explore tagged Tumblr posts
Text


S4EP15 ★ Death Takes a Holiday
#samwinchesteredit#sam winchester#supernaturaledit#*m#s4#sam#i am Struggling keeping these under 10mb...#hes so beautiful he deserves one billion huge sized gifs
891 notes
·
View notes
Note
Which tutorials did you find for your gif?? It looks so pretty!
hey thanks anon! how do i say this. the difference between the two gifs isnt really thanks to any tutorial it was just me messing around with the colors in photoshop for the first time, heres the settings i used: brightness +26, contrast +40, vibrance +77
i need you to understand that im a total noob so i have no idea if theres any like standard procedure gifmakers use for making their gifs look so cool, im still figuring it out, the colored gif looks nice on my computer but when viewing on my phone it looks way brighter, i wouldnt say it looks bad but it was something i didnt expect
in case youre interested in gif tutorials just in general here is a few i learned from - [1] [2] [3] [4] [5]
a lot of these tutorials cover the same ground but i figure if youre interested to learn its good to learn from many sources, but i also dont really follow any of these exactly to a T, i figured out my own way as i learned and ill continue to figure it out
the biggest variety in these tutorials is what program they use to capture the video in the first place, most of these do it by taking screencaps of each frame one by one and i HAVE made a gif like a that a few times by now but i prefer just rendering the part i want to gif in sony vegas and then importing the video to photoshop with file>import>video frames to layers and then cutting down on the frames as is shown in the 2nd link, ive found i like this method but i dunno! maybe theres a reason everyone recommends to take screenshots?? maybe gifs from screenshots look way better idk man im still figuring it out LETS LEARN ABOUT GIFS TOGETHER🫴
also some of these go way more in depth than i am comfortable to even think about yet like in the fifth one when they started pulling out the graphs and charts i was out GDHSBFKF
this got way longer than i was expecting so hopefully i managed to say something helpful in here, its always fun to learn new things, i wish you good luck!
#if you🫵 are reading this and are a gifmaker and think you can give some good advice by all means please take over my post#asks#anon#long post#the main thing i still want to learn is how the hell people make these amazing lomg gifs with lots of action and stuff flying around and#still manage to keep it under 10mb PLS#UHHHHHHJHHGJJHH#*LONG#IM STRUGGLING SO HARD TO MAKE A GIF THATS SET BY A LAKE SO THERES A LOT OF FRAMES OF WATER MOVING AND IDK#IN WHICHEVER WAY I RENDER IT IT ALWAYS LOOKS KINDA SHIT TO ME BUT ILL FIGURE IT OUT HOPEFULLY#thanks for reading but also dont ever listen to me i am always talking out my ass
2 notes
·
View notes
Text
gif making tutorial for the inimitable @snowysobsessions
disclaimer: this is exactly how i do it, but im basically just winging it tbh. there may be other methods that are quicker and/or look way better. this is just the way to which i have become accustomed. i am not a fancy ass gif maker who does colouring and sharpening or uses photoshop whatever, those folks are the real pros. i just like to get the job done :) if you wanna make really fancy gifs other tutorials may be more appropriate. ok lets get into it under the cut!
step 1:
select your source. for the purposes of this tutorial im going to stay on-brand and use this video of weird al on 30 rock (aka the original Milf Weird Al).
youtube
step 2:
either download the video (i dont have a good recommendation for a website for that unfortunately, they all seem virus-ridden these days) or screen-record the part of the video you want to turn into a gif. for me, thats the part with al in it.
my computer runs windows something - 11 maybe? and it comes with screen recording software built in that saves into a folder called "captures" in the video folder, which can be activated with the keyboard shortcut Windows Key + Alt + R. most phones also have screen recording functions, you could record it on your phone and transfer it to your computer? (for the record the website i use works on mobile too, but its very slow and annoying so i much prefer to use my laptop.)
step 3:
use video editing software of your choice to cut the clip down to just the part you want giffed. i use microsoft clipchamp because thats whats on my computer. it can also be used to crop away any black bars around any video clip, which is useful, because a properly cropped gif will probably be better quality. export the clip in as high quality as possible.
tip: try to keep the gif 3 seconds or under. this keeps the filesize down. tumblr gif size limit is 10MB, but i keep all my gifs 5MB or below because otherwise the loading time/storage burden is painful, and like i said, im not making fancy ones here, i dont mind them being a bit lower quality.
here is my clip. i saved it muted because its filesize is smaller that way.
step 4:
go to https://ezgif.com/video-to-gif which looks like this.
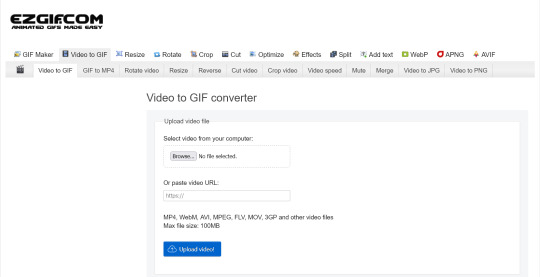
note that ezgif has tools for cutting, cropping and resizing videos if you dont have access to any video editing tool. its quicker if you do it in advance, though, i find.
upload your video and you will see this type of screen appear.
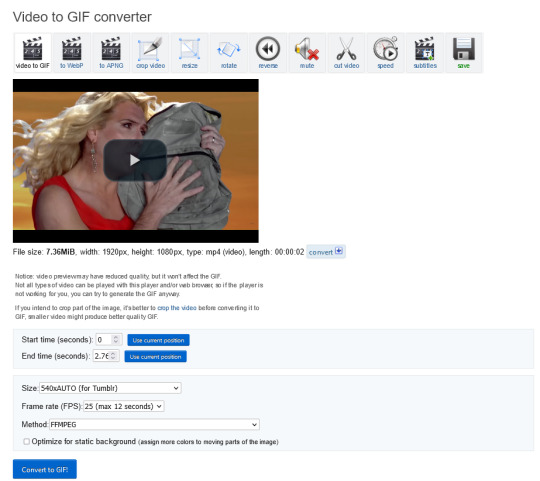
if youre uploading it to tumblr, the 540xAUTO size option is the one i go for by default, but it also has the following size options.
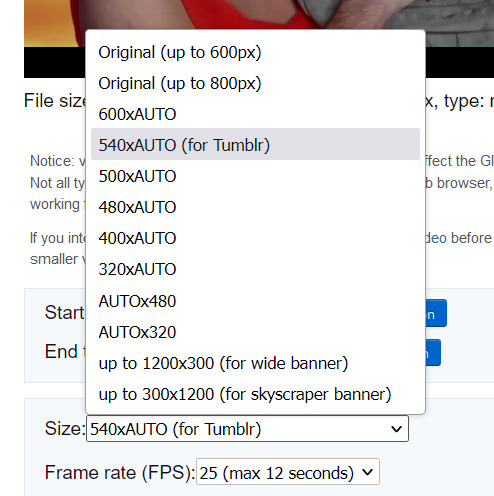
smaller size = smaller filesize, and you want the filesize as small as possible within reason. i sometimes make a gif smaller in dimensions if i'm really struggling to get the filesize below 5MB.
next is the frame rate: i set it to 25 because thats closest to the oriignal frame rate of most recorded video, but in order to make savings on filesize, it can be selected to 20FPS or 12FPS. i wouldnt recommend lower than that unless you want it to look weird and choppy, in which case, go ahead, and i wouldn't recommend higher unless you literally need the animation to be smooth as silk - for making it slowmo, for example.
i don't mess with the "method" drop down bc idk what it means.
the "Optimise for static background" tickbox is useful for if someone is doing something on a totally still background, because it reduces filesize by not animating every single bit of background in every frame. it could be helpful here as our background is not moving at all, just our heroine Alfina. i'm going to tick it.
now you can click "Convert to GIF". you should see something like this - itll be animated of course, this is just a screenshot.
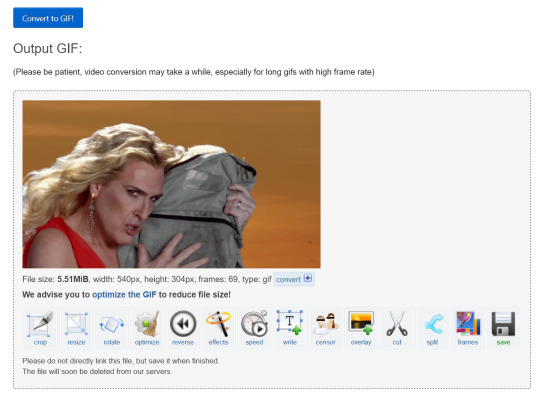
our gif looks crispy fresh (and has 69 frames - NICE), but its filesize is 5.51MB which is more than id like it to be, but first we're gonna look at Effects, so I'm not going to click the "Optimise" option yet.
step 5:
clicking effects will provide the following options
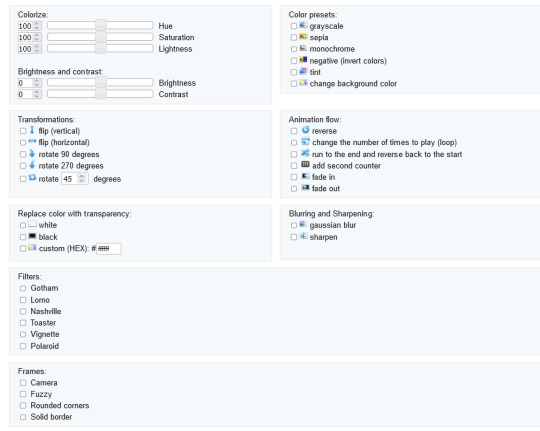
if the video was sort of dark and hard to see, for example if it was live footage, it can be helpful to increase the brightness. changing the brightness and contrast makes our gif look like this, and makes it pop a little more.
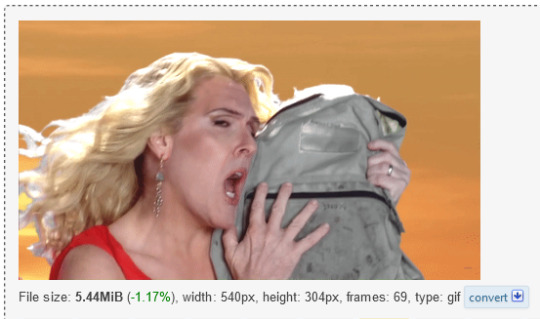
you can keep playing with the settings and clicking "Apply selected" until it looks about right to you, or not add any effects at all - it's up to you. I hit the back button in my browser to go back to the gif before i added the effects, then I went to Optimise.
step 6:
the Optimise screen is like this
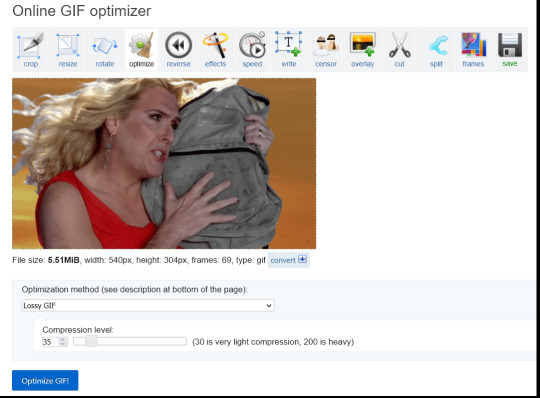
i tend to stick with the Lossy GIf optimization method. I put the compression level down to 30, and press Optimise GIF and see what happens.
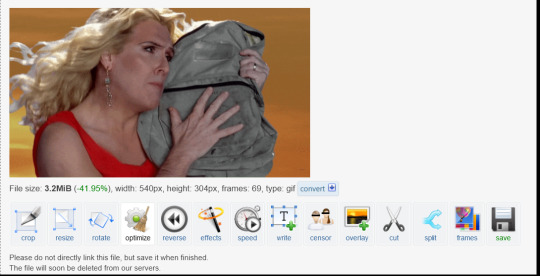
as you can see, the filesize has been reduced by 41.95% to 3.2MB without a super noticeable drop in quality.
if you set the compression level to 200, this is what it looks like
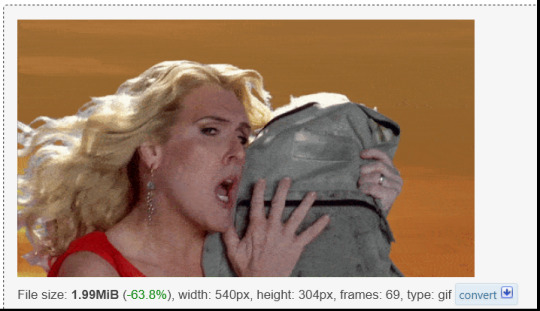
much more pixely, and not much further reduced in size, so i stick to the lower end of the compression scale.
this is our finished gif! isnt she beautiful. i just right-clicked and hit save on it on the webpage after generating - on mobile, i guess you'd long-press on it to download it.

hope that helps!!! lmk if you need help with any other aspect like changing speed or overlays or anything but honestly it's pretty intuitive once you know how to do these bits.
17 notes
·
View notes
Note
woah!!! how did you do that fatou gifset? may i request a tutorial?
omg of course! i’m going to just give you an explanation of how i put it all together, for the sake of not making this a billion years long i’ll assume you’re already comfy with making, coloring, exporting gifs etc.
if you’re curious how to make gifs like the one below from this set of mine, a lil tutorial will be under the cut!
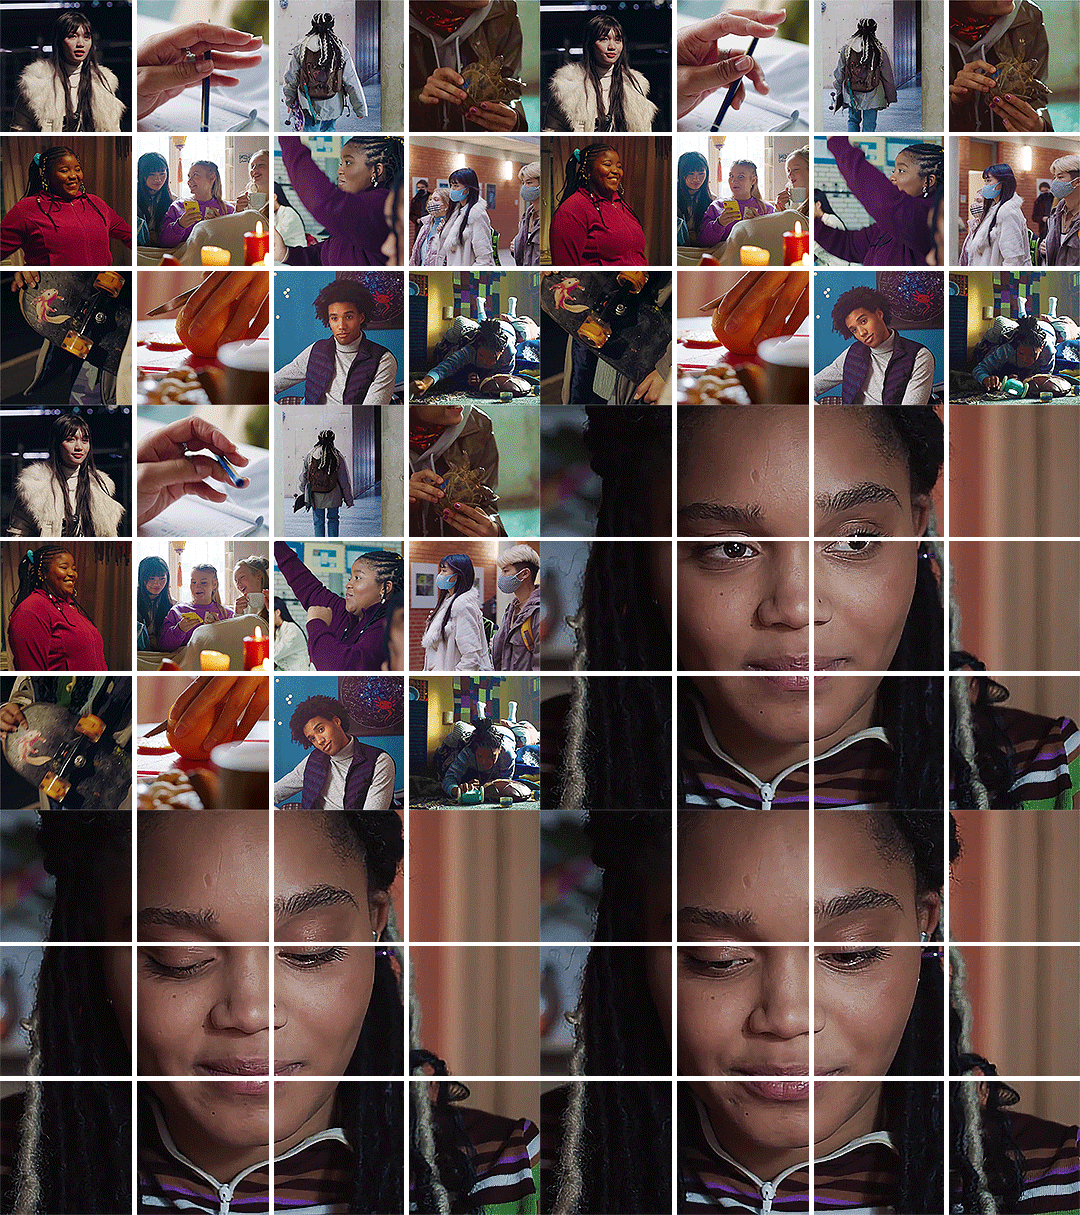
ok so you can do this with any number of gifs you want, a 4 by 3 grid is what I went with because 3 by 3 will mean that you’ll struggle to keep it under the 10mb limit.
If you’re making a 4 by 3 grid, you’ll need 12 square gifs that are 135 by 135 pixels and one 4 by 3 aspect ratio gif for the big gif at the end, which will be 540 by 405 pixels. For a 3 by 3 grid, use 9 square gifs that are 180 by 180 pixels and one that’s 540 by 540 for the big gif.
I made all of my gifs and sharpened them, but didn’t do any coloring yet. You can color first but I liked waiting to do it all at once, I feel like it helps it look cohesive.
Whatever way you make gifs, you want to make sure all the small gifs have the same number of frames. For my set I made all of my gifs 30 frames but you could probably get away with a little more while staying under 10mb for the finished product.
You might prefer to skip this step to save some time, but I exported all of my sharpened, not colored gifs, then opened all of those .gif files in photoshop, just to make sure there were the same frames for all of them. Regardless of if you do this or not, you will want all 10 or 13 of your gifs as smart objects.
If you have exported them, all you need to do to make your layers a smart object is to switch to the timeline (the purple bars stacked in the timeline window instead of a bunch of little squares of your frames.), select all your layers, right click, and say convert to smart object. Make sure you switch to the timeline before you convert to smart object or the gif won’t play.
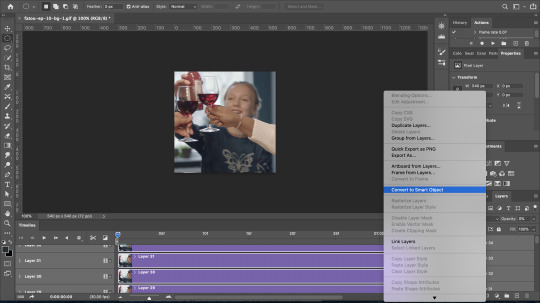
Once I have all of my smart objects, I take one of my small gifs and increase the canvas size to 540 by 405.
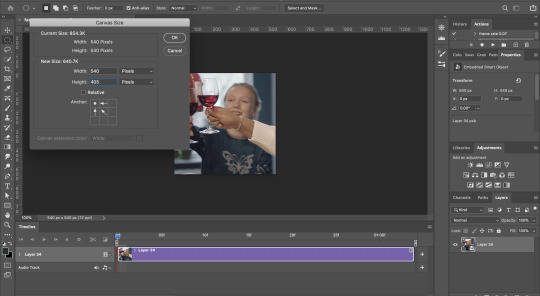
Then go through to each gif file, copy the smart object, and paste it into that large canvas. Photoshop should snap your gifs to be aligned with each other when you rearrange stuff. Put all the gifs touching each other. Don’t bother tryin to leave 5px borders, we’ll deal with that later!
When you paste your big gif, make sure to move the start of it to the end of the others, so the grid of small gifs plays, then the big gif by itself.
Once all the gifs are pasted into the same file, rearrange the grid however you like. You should be seeing something like this:
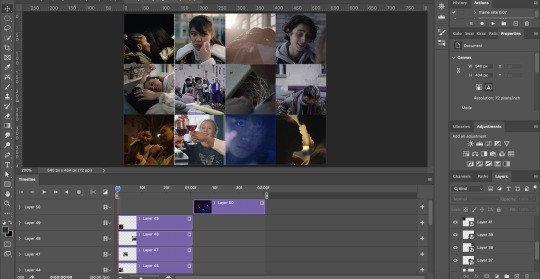
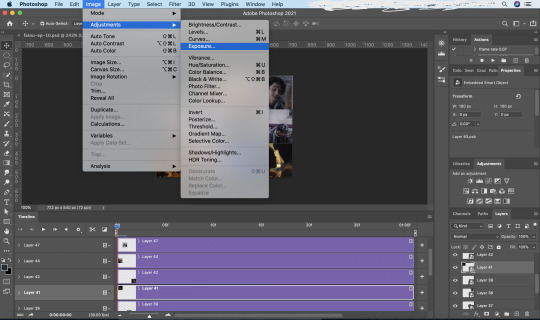
Now is when I did coloring. I put adjustment layers for exposure, vibrance, etc. on the very top so they affected all the gifs. Then if particular gifs are too dark, too orange, not as vibrant as the others, etc. you can adjust individual gifs by clicking the smart object of the gif you want to fix in the layers panel, then going up to image > adjustments and chose what adjustment you want to make. This creates a smart filter on that one gif, just like when you sharpen a smart object.
Once your coloring and placement of your gifs is to your liking, select all your gifs including the big gif, and right click, convert to smart object. You now have a bunch of smart objects nested into a big smart object. Don’t worry about not being able to edit, though. All you have to do is right click and choose edit contents. This will bring up a .psb file that has all of the layers and adjustments inside your smart object. All you have to do is make any changes in that file, save it, and exit out. The smart object will update itself.
This is where I bring the borders back in with a layer mask. I find it much easier to put in the 5px borders this way rather than trying to do the math and space things out properly. It also guarantees you clean lines.
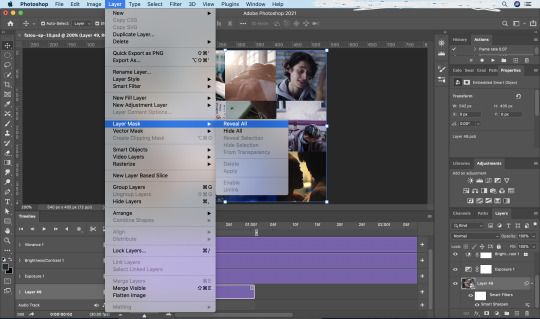
So I select the smart object that has all of my gifs and coloring in it, then go to layer > layer mask > reveal all to create a layer mask that will go over everything.
Then I go to the tool bar and select the single row marquee tool. I make sure I can see the grid of small gifs to do this part and I zoom in as far as I can on one of the horizontal intersections. I click on the line where the gifs meet and a row of pixels will be selected.
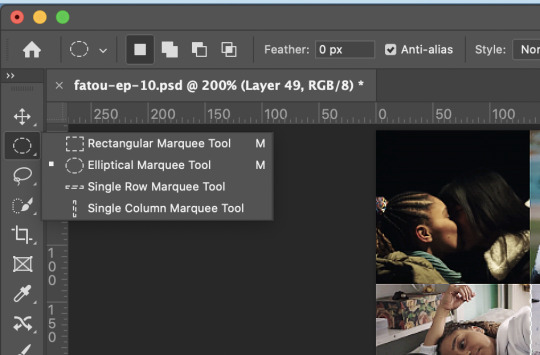
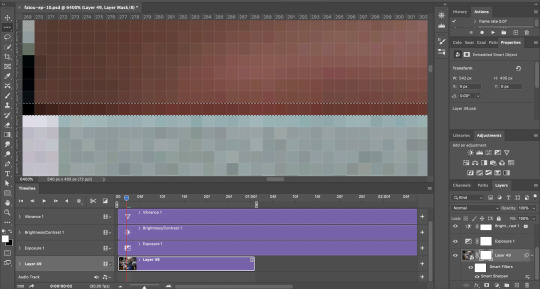
I switch back to the regular arrow which will give me handles to increase the selection to 5px tall. Once I have this 5px selection centered over the intersection, I click on the layer mask, then use the eraser tool over it to remove the selected area. You can click command or control + d to deselect, then repeat this for all of the intersections of the grid, using the single column marquee tool for vertical intersections.

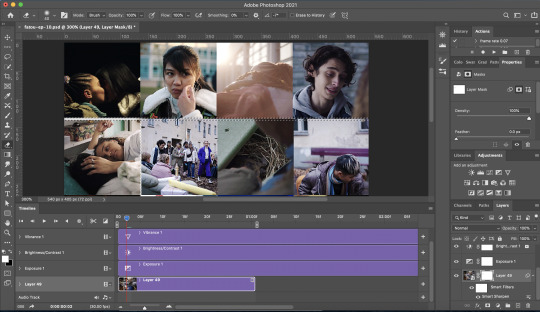
Now your grid is separated and your big gif is cut into pieces that line up, all in one step. And for any other gifs like this that you make, you can copy and paste the smart object you made here into the file you're working on and drag the layer mask onto the smart object you’re making, then delete the old smart object from that file once you’ve gotten its layer mask. So although the process of making the layer mask is a bit tedious, if you save your first one as a psd, you can reuse the layer mask anytime you need to.
Obviously you’ll need to export and adjust the delay of your finished product. I recommend a much slower delay than usual, since the gif switches, and the grid will only be about 30-35 frames, I did a 0.08 delay, but you could go even slower if you want. It’s good for it to be slow, because it gives people time to actually see what’s happening and not get a headache.
That’s pretty much the gist! I hope this was helpful, but I am more than happy to clarify anything if you want to send me an ask or dm!
12 notes
·
View notes